Should I Order Standard Or Large?
Our Standard Doorstop is available in a wide range of colours and in both straight & angled types. The standard angled type is 45°
Following customer requests, we now have a larger 150mm version of our Standard (Angled) Doorstop available – ideal for protecting wall-mounted lanterns against swinging doors! The angle on this version is 22½° with other angles available.


How To Measure & Fit Your DoorStop
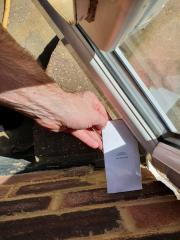
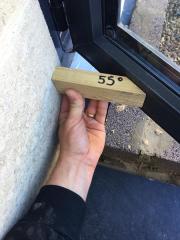
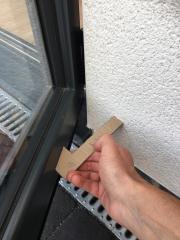
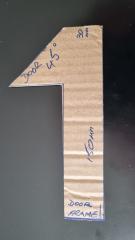
If in doubt, we suggest making a cardboard angle guide such as this to check your door alignment & decide on the best angle of doorstop to install. Make one for each size & angle combination that you’re considering! (Check out the gallery at foot of page for more ideas)


For best results and to avoid doorstop damage…
Please ensure that the opened door is hitting the doorstop square on, rather than at an angle.
Your doorstop needs to be placed at the right position on the wall to match the doorstop magnet angle type & to suit the door angle. This is essential for your doorstop to work properly and ensures that you get the best hold strength from your doorstop & magnets (where fitted). Please use our suggested cardboard cutouts shown above to ensure you get the correct choice of angle – 22½°, 45°, 60° or 90°
We’ve seen a few instances where clients have tried to fit the doorstops in such a way as to get another inch or two of opening from the door – but the door/magnet doesn’t then meet the doorstop rubber square on and either fails to hold or causes damage.
For best results and if in doubt about a particular application, please call us for advice
Call: 07775 486 683
Magnetic DoorStop Fitting Instructions
Package Contents (per doorstop ordered).
• 1 x Rubber Doorstop (Attached to bracket).
• 2 x Screw(s).
• 1 x 25-30mm Stainless Steel Screw(s).
• 1 x Disk Magnet (Cover Magnet).
• 1 x Disk Magnet with hole (Fixing Magnet).Do not separate magnets until ready for fixing to door
• 1 x Nylon Spacer discard later.
IT IS 5 TIMES EASIER TO SLIDE NEODYMIUM MAGNETS APART THAN IT IS TO PULL THEM APART. THE MOST COMMON CAUSE OF BROKEN MAGNETS IS WHEN TWO MAGNETS ARE RELEASED AND ALLOWED TO COLLIDE TOGETHER, CAUSING ONE OR BOTH MAGNETS TO CHIP OR SHATTER.
Please use the stainless steel fixings provided
Using old screws from your toolbox may result in unsightly rust marks!
Please ensure that the opened door is hitting the doorstop magnet square on, rather than at an angle. Your doorstop needs to be placed at the correct angle on the wall for it to match the contact angle with the door magnet. Doorstop brackets are available in 22.5°, 45°, 60° or 90° variants.
We’ve seen a few instances where clients have tried to fit the doorstops in such a way as to get the another inch or two of opening from the door – but the door/magnet doesn’t then meet the doorstop rubber square on and either fails to hold or causes damage.
• Hold bracket against wall at the required angle position and let the magnet hit the door square on, mark the top hole with a pencil / pen.
**DO NOT USE A DRILL TO MARK AS THIS WILL DAMAGE THE BRACKETS PROTECTIVE COATING*
Please read your fitting instructions carefully!
WARNING: Please do not separate your magnets before you’re ready for fixing them to your door
The nylon spacer is only to keep the magnets apart. PLEASE DISCARD LATER.
• Drill the first hole using the No. 8 masonry drill bit with rawl plug.
• Insert rawl plug and fasten the bracket to the wall using a screw provided.
• TIGHTEN SCREW SO THE BRACKET CAN STILL BE ADJUSTED WITHOUT MUCH FORCE
• Swing bracket away so you have room to drill the second hole without damaging the protective coating. **You may choose to remove the bracket completely from the wall**
• Fasten both screws accordingly.
• Place the fixing magnet with a hole onto the centre of the rubber stop
• Peel off double-sided green tape on rear of fixing magnet.• Close door and apply a moderate amount of pressure until fixing magnet remains attached to the door.
• You may choose to fasten the fixing magnet with the stainless steel screw provided at this point.
• Drill pilot hole for stainless steel screw. (2.3mm drill bit)
• Please use HAND SCREWDRIVER for stainless steel screw.
• Place cover magnet over hole on fixing magnet.
• Enjoy your new doorstop!
Non-Magnetic DoorStop Fitting Instructions
Package Contents (per doorstop ordered).
• 1 x Rubber Doorstop (Attached to bracket).
• 2 x Stainless Steel Screw(s).
• 2 x Stainless Steel Rubber Bonded Washer.
• 1 x Bracket.
You will require the following tools to complete the installation:
• 1 x Masonry Drill.
• 1 x No. 8 Masonry Drill Bit.
• 2 x No. 8 Rawl plugs (brown).
• 1 x No. 10mm Socket and Driver.
Please use the stainless steel fixings provided
Using old screws from your toolbox may result in unsightly rust marks!
When fitting doorstop please take care as to not damage the protective coating.
• Hold bracket against wall at the required position and mark the top hole with a pencil / pen.
**DO NOT USE A DRILL TO MARK AS THIS WILL DAMAGE THE BRACKETS PROTECTIVE COATING**
• Drill the first hole using the No. 7 masonry drill bit with brown plug.
• Insert rawl plug and fasten the bracket to the wall using a stainless steel screw(s)provided. **TIGHTEN SCREW SO THE BRACKET CAN STILL BE ADJUSTED WITHOUT MUCH FORCE**
• Mark bottom hole again with a pencil / pen.
• Swing bracket away so you have room to drill the second hole without damaging the protective coating. **You may choose to remove the bracket completely from the wall**
• Fasten both screws accordingly.
• Enjoy your new doorstop!
For Patio Doors. For Gates. For Bi-fold Doors. For Stable Doors. If a door can slam, then Doorstopworld it!